Beginner's Guide to Sourdough Bread: A Step by Step Tutorial
Jun 13, 2025 / btwgardenmachine/
Choosing the Right Flour and Environment for Your Starter
Whole grain flours like rye or whole wheat jumpstart microbial activity due to their nutrient density. Many bakers begin with these before transitioning to bread flour. The starter's environment should maintain steady temperatures between 21-24°C (70-75°F) - drastic fluctuations can stress the microbial community.
Light also affects starter development. While not requiring direct sunlight, keeping it in a bright kitchen helps maintain consistent temperatures. Avoid refrigerating a new starter until it's fully established (typically 2-3 weeks old), as cold temperatures dramatically slow microbial activity during this critical development phase.
Feeding and Maintaining Your Sourdough Starter Over Time
Regular feedings maintain microbial balance. For room temperature maintenance, feed every 12-24 hours using a 1:1:1 ratio (starter:flour:water by weight). Refrigerated starters require weekly feedings. Watch for visual cues - a healthy starter should double in volume within 4-8 hours after feeding, displaying bubbles and emitting a pleasantly sour aroma.
Seasoned bakers recommend maintaining two jars - one for baking and one as backup. This practice ensures you always have active starter available. If a gray liquid (hooch) forms on top, simply pour it off and proceed with feeding - this indicates hunger but doesn't signify spoilage unless accompanied by mold or unpleasant odors.
Essential Ingredients and Tools Needed
High-Quality Flour
Flour selection dramatically impacts your bread's character. While bread flour provides excellent structure, incorporating 10-20% whole grain flour adds nutritional value and flavor complexity. Stone-ground flours retain more nutrients than roller-milled varieties. For consistent results, stick with the same flour brand once you find one that works well with your starter.
Consider flour's protein content and ash content (mineral percentage). Higher protein means stronger gluten potential, while higher ash content (common in European flours) contributes to fermentation activity and flavor development. Always store flour in airtight containers to prevent staleness and pest infestation.
Active Sourdough Starter
Your starter's readiness determines baking success. An ideal starter should pass the float test - a small spoonful floats in water, indicating sufficient gas production. Starter maturity also affects flavor - younger starters tend milder while older, well-maintained ones develop deeper complexity.
Maintain starter consistency - if you typically bake with 100% hydration starter (equal parts water and flour by weight), keep this ratio consistent in your feedings. Changing hydration levels requires microbial adjustment periods that can temporarily affect baking performance.
Water
Water quality often gets overlooked but significantly impacts fermentation. Chlorinated tap water can inhibit microbial growth - either use filtered water or let tap water sit uncovered overnight to allow chlorine evaporation. Water temperature controls fermentation speed - cooler in summer, slightly warmer in winter maintains consistent proofing times.
Mineral content matters too. Very soft water may benefit from a pinch of calcium salts, while hard water might require slight adjustment to salt quantities in the dough. When experimenting with different water sources, note any changes in fermentation activity to identify what works best for your baking environment.
Basic Baking Tools
Beyond mixing bowls and measuring tools, consider these essentials:- Bench scraper for handling sticky dough- Dough whisk for easier incorporation of ingredients- Proofing container with measurement markings to track rise- Lame or razor blades for decorative scoring- Instant-read thermometer to verify doneness (internal temperature should reach 88-94°C/190-200°F)
For consistent results, use the same tools in the same order for each bake. This standardization helps identify variables when troubleshooting issues. Non-reactive materials like glass or stainless steel work best for long dough contact.
Additional Equipment for Success
While not strictly necessary, these tools enhance the baking experience:- Brød & Taylor folding proofer for temperature control- Baking steel for improved heat transfer- Bread sling for easier Dutch oven loading- Crumb shot light box for documenting results- Dough calculator app for precise hydration adjustments
Seasonal bakers might invest in a fermentation chamber to maintain ideal temperatures year-round. However, many excellent loaves get made with just basic equipment - skill and understanding matter more than fancy gadgets.
Step-by-Step Sourdough Bread Making Process
Preparing the Starter and Ensuring Its Viability
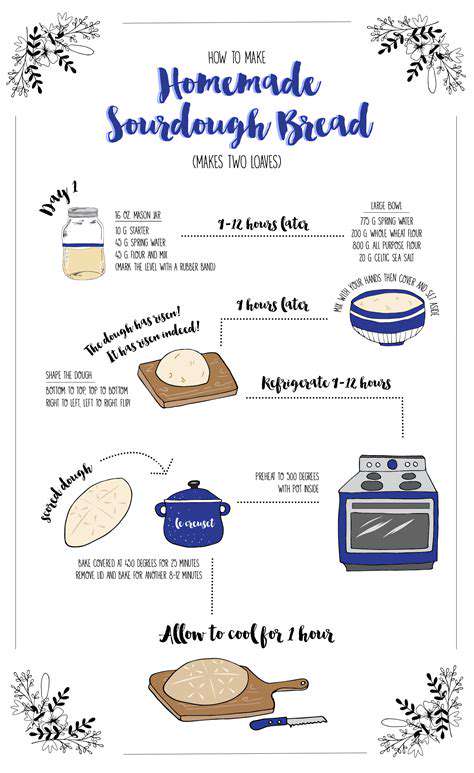
Begin preparations 2 days before baking. Feed your starter twice daily to peak activity. Perform the float test before mixing dough - if it sinks, wait a few more hours. Some bakers prefer using starter at different stages: younger for milder flavor, more mature for pronounced sourness.
Starter temperature matters - if your kitchen runs cold, use slightly warmer water (about 27°C/80°F) in feedings to boost activity. Conversely, in hot climates, cooler water prevents over-fermentation. Document feeding times and responses to identify your starter's optimal baking window.
Mixing and Kneading the Dough for Optimal Gluten Development
Autolyse (flour and water rest before adding salt and starter) significantly improves dough handling. Allow 30-60 minutes for enzymatic activity to begin gluten development. When adding starter and salt, mix thoroughly to ensure even distribution - incomplete mixing leads to inconsistent fermentation.
Kneading techniques vary:- French fold for high-hydration doughs- Stretch and fold during bulk fermentation- Coil folds for very wet doughsChoose methods based on dough consistency and your comfort level. The goal isn't exhaustive kneading but developing sufficient gluten strength to trap fermentation gases.
Shaping, Proofing, and Baking for Perfect Crust and Texture
Pre-shape the dough into loose rounds, resting 20-30 minutes before final shaping. This bench rest relaxes gluten for easier handling. Final shaping creates surface tension - use the pinkie-edge technique to pull dough taut without tearing. Proof in a floured banneton or towel-lined bowl.
Proofing times vary by temperature:- 3-5 hours at 21-24°C (70-75°F)- Overnight in refrigerator for delayed baking- 1-2 hours in a proofing box at 27°C (80°F)
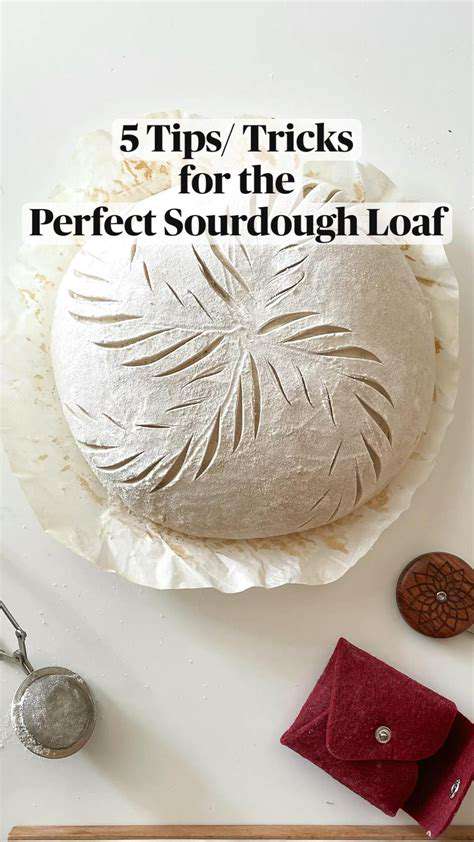
Baking begins with scoring - make confident, swift cuts at 30-45 degree angles about 1cm deep. Steam is crucial for oven spring - either use a Dutch oven or introduce steam manually for the first 20 minutes. Rotate the loaf halfway for even browning, and verify doneness by internal temperature (88-94°C/190-200°F) rather than just color.
Tips for Perfect Sourdough Loaves
Understanding the Basics of Sourdough Fermentation
Fermentation isn't linear - it accelerates as temperature rises. A 5°C (10°F) increase can double activity. Learn to read dough rather than watching the clock: look for 30-50% volume increase, bubbles on surface, and a slightly domed (not flat) top. Under-fermented dough bakes up dense; over-fermented loses structure.
Temperature control is the baker's secret weapon. Use water temperature to adjust dough temperature: cooler in summer (20°C/68°F), warmer in winter (30°C/86°F) to maintain consistent fermentation times. The ideal dough temperature ranges 24-26°C (75-78°F) for most recipes.
Choosing the Right Flour and Hydration Levels
Flour absorption varies by brand and harvest. When trying new flour, mix a small test batch to observe hydration needs. Higher protein flours tolerate more water, while whole grains absorb more liquid. Artisan millers often provide absorption specifications - use these as starting points.
Hydration percentages (water relative to flour weight) range:- 65-70% for easier handling- 75-80% for more open crumb- 80%+ for advanced techniques
Adjust hydration seasonally - flour absorbs more in humid conditions. In dry climates, slightly increase hydration to compensate for evaporation during mixing and fermentation.
Techniques for Shaping and Scoring the Dough
Shaping serves two purposes: creating tension for oven spring and forming the loaf's structure. For boules (rounds), use the envelope fold method. For batards (ovals), try the letter fold technique. Always shape gently to preserve gas bubbles - rough handling degrades crumb structure.
Scoring requires a sharp blade held at 30-45° angles. Patterns aren't just decorative - they control expansion:- Central slash for even rise- Offset cuts for ear development- Decorative patterns for artistic expression
Practice shaping with play dough to build muscle memory without wasting ingredients. Film your shaping attempts to analyze and improve technique between bakes.
Optimal Baking Conditions for Crust and Crumb
Oven temperature significantly affects crust development. While 230°C (450°F) works for most home ovens, some benefit from higher heat. If your loaf colors too quickly but remains underdone inside, try:- Reducing temperature 10°C (25°F)- Extending baking time- Using thermal mass (baking stone/steel)
Steam management makes or breaks crust quality. Professional ovens inject steam, but home bakers can:- Spray loaf with water pre-baking- Add ice cubes to Dutch oven- Place water pan in oven
Track every variable - flour brand, hydration, temperatures, timings - in a baking journal. This documentation helps replicate successes and troubleshoot issues across multiple bakes.