Homemade Candy Recipes: Sweet Treats at Home
Jun 16, 2025 / btwgardenmachine/
Ingredients and Equipment
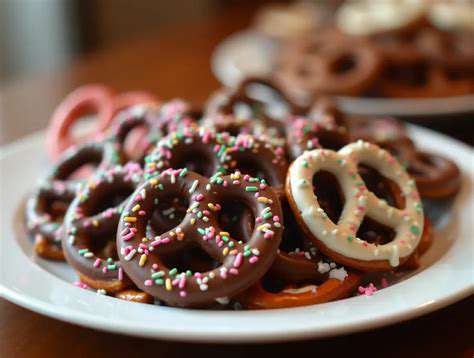
Creating mouthwatering chocolate-covered pretzels at home starts with gathering the right ingredients. Opt for premium dark chocolate with at least 70% cacao content - this guarantees both depth of flavor and that perfect melt-in-your-mouth texture. You'll want fresh pretzels (the soft variety works beautifully) and some basic kitchen tools. A double boiler setup - simply a heat-proof bowl over gently simmering water - works wonders for melting chocolate without scorching it. Don't forget parchment paper; it's your best friend for preventing messy cleanups.
For equipment, arm yourself with a sturdy whisk for smooth chocolate blending and a couple of trusty spatulas for coating those pretzels evenly. A cooling rack elevates your results significantly by letting air circulate around each treat, preventing any sogginess while the chocolate sets.
Melting the Chocolate
Mastering chocolate melting makes all the difference between good and great results. The double boiler method is foolproof - just keep the water at a gentle simmer and stir constantly until you achieve that perfect, velvety consistency. Watch the temperature closely; chocolate turns from smooth to grainy surprisingly fast if overheated. Once melted, let it cool slightly - you want it warm enough to flow smoothly but not so hot it slides right off your pretzels. A teaspoon of cream or butter can transform your coating from good to luxuriously silky.
Dipping and Cooling
Here's where the magic happens: fully immerse each pretzel in chocolate, then let excess drip off before placing on parchment. Proper spacing on the baking sheet prevents chocolate bridges between treats - though some might argue those accidental connections are half the fun! For picture-perfect results, resist touching them while they set. The wait is worth it - properly cooled chocolate develops that satisfying snap when you bite into it. Store leftovers (if you have any!) in an airtight container to maintain freshness.
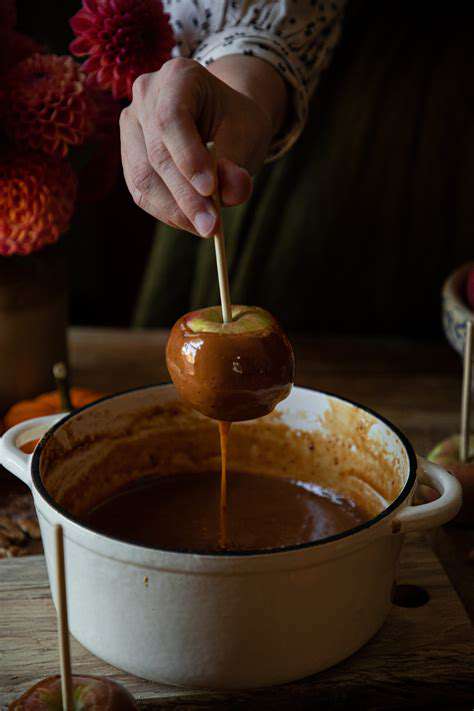
Chewy Caramel Apples: A Sweet Autumn Treat
A Classic Fall Delight
Nothing captures autumn's essence quite like biting into a chewy caramel apple. The contrast between crisp, juicy fruit and rich, buttery caramel creates pure magic on a stick. This nostalgic treat transcends generations, evolving from simple fairground fare to gourmet dessert art. What makes it special is its versatility - whether you prefer classic simplicity or extravagant toppings, there's a version to delight every palate.
Crafting the Perfect Caramel
The soul of a great caramel apple lies in its coating. Temperature precision is non-negotiable - too hot and it burns, too cool and it never properly sets. A candy thermometer becomes your most trusted tool during this process. The caramel should pull away slightly from the pot sides when stirred, indicating perfect doneness. For adventurous bakers, infusing caramel with vanilla, bourbon, or even chili flakes can create showstopping flavor profiles.
Beyond the Basics: Creative Toppings
This is where your creativity can shine. While traditionalists might stick to chopped peanuts, why not try toasted coconut flakes, crushed peppermint, or even bacon bits? Layering textures takes caramel apples from tasty to extraordinary - imagine dark chocolate drizzle over salted caramel with pecans. The apple variety matters too; Granny Smiths offer tart contrast, while Honeycrisps bring natural sweetness that caramel enhances beautifully.
Preparing for the Perfect Bite
Success starts with apple selection. Choose firm, unblemished fruits with stems intact - these become natural handles for dipping and eating. Thoroughly dry each apple before dipping; even slight moisture can cause caramel to slide right off. After coating, let them set on greased parchment, resisting the urge to refrigerate (this can cause condensation). For gift-giving or parties, individually wrapping in cellophane keeps them fresh while showcasing your handiwork.