Homemade Cookies: Classic Chocolate Chip Recipe
Jun 15, 2025 / btwgardenmachine/
Preparing the Ingredients
Kneading dough begins with preparation. Gather everything you need and make sure ingredients are at proper temperatures. Having everything ready before starting saves time and avoids frustration. You'll need flour, water, yeast, and extras like salt or sugar. Temperature matters - warm ingredients help yeast work better. Room temperature works for most recipes, while water should be lukewarm to not shock the yeast.
Measure flour carefully. A kitchen scale gives best results, especially for consistent baking. Wrong measurements create dough that's either sticky or dry, making it hard to handle. If using cups, spoon flour in lightly - don't pack it down for accurate amounts.
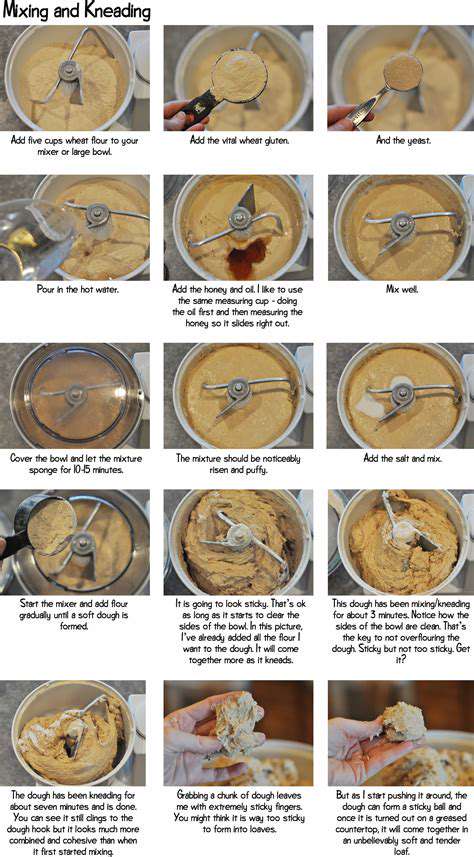
Kneading the Dough: Essential Techniques
Kneading develops gluten, which gives bread its texture and rise. Well-kneaded dough feels smooth and stretchy. This spreads yeast evenly for proper fermentation. Consistent kneading creates even gluten development throughout.
Try different kneading methods. One way is folding and turning on a floured surface. Or use a stand mixer with dough hook. Kneading time varies by recipe and flour type. Knead enough to develop gluten but stop before dough gets tough.
Resting and Proving the Dough: Crucial Steps
After kneading, dough needs to rise. This rest lets yeast work and improves texture. Resting relaxes gluten strands for lighter bread. Cover dough to prevent drying.
The dough will grow noticeably during proofing from yeast's carbon dioxide. Ideal proofing temperature depends on yeast type and recipe. Watch closely to prevent over-proofing, which makes bread dense.
Shaping and Baking the Dough
When dough rises, shape it as desired. Different breads need different shaping. Handle gently to protect the gluten structure you've created. This keeps the final texture and shape right. Techniques include folding, twisting, or braiding.
Heat your oven first. Baking time and heat depend on bread type and size. Use a baking stone or pan for even baking and crisp crust. Proper baking gives golden crust with soft inside.
Baking Your Cookies to Perfection
Understanding the Ingredients
Great cookies start with knowing each ingredient's role. Flour builds structure - type affects results. Sugar matters too - white sugar makes crispness, brown sugar adds moisture and flavor. Butter brings tenderness and taste. Quality butter at right softness prevents dry cookies. Chocolate chips or other mix-ins complete them. Understanding these interactions improves baking.
Measure carefully. Use proper cups and spoons - guessing leads to inconsistency. Measure softened butter carefully without letting it melt completely.
Achieving the Right Consistency
Perfect dough consistency makes even cookies. Overmixing makes tough cookies from too much gluten. Undermixing leaves ingredients uneven. Gentle mixing works best. Stiff dough won't spread right; too soft makes flat cookies.
Baking Time and Temperature
Baking perfectly needs right time and heat. Too long makes dry cookies; too short leaves them doughy. Start with less time and lower heat, then adjust. Bake until edges brown but centers stay slightly soft. Watch closely near end.
Cooling and Storage
Let cookies cool on sheet before moving to rack. This keeps them from getting soft. Complete cooling on rack firms them up. Store in airtight container at room temperature. Keep in dry place to stay fresh for days.
Cooling and Enjoying Your Homemade Cookies
Optimal Cooling Techniques
Cooling right prevents sogginess. Use wire racks away from drafts for even cooling. Avoid leaving on baking sheets - makes bottoms sticky. Bigger cookies cool slower than small ones. Check with thermometer if recipe specifies temperature. Always cool fully before storing.
Storage Strategies for Maximum Freshness
Airtight containers keep cookies crisp at room temperature. Avoid humid places that soften them. For longer storage, freeze separately first then bag together to prevent sticking.
Enhancing Cookie Flavor with Cooling
Cooling improves flavor as sugars crystallize, boosting sweetness and crispness. Flavors blend better when cooled completely.
Preventing Cookie Collapse During Cooling
Cookies fall if removed from oven too soon or placed on hot surfaces. Cool completely on rack before moving. They should be firm enough to handle without breaking.
Serving Suggestions for Your Chocolate Chip Cookies
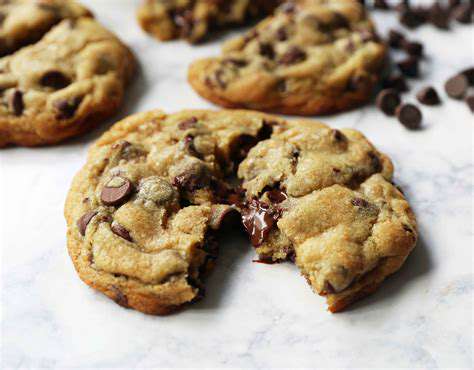
Serve warm with ice cream for special treat. Pair with coffee or hot chocolate. Great for parties or simple snacks with milk. Versatile for any occasion.
Tips for the Best Chocolate Chip Cookies
Choosing the Perfect Chocolate Chips
Dark chips give rich flavor; milk chips taste sweeter. Semi-sweet balances both. Bigger chips make more chocolate in each bite.
Preparing the Ingredients
Butter should be soft but not melted for best mixing. Room temperature eggs mix better. Measure carefully for consistent results every time.
Mixing the Dough
Mix dry ingredients first to prevent lumps. Don't overmix - just enough to combine. Few minutes usually suffices.
Baking Time and Temperature
Watch cookies closely and adjust time as needed. Overbaked gets dry; underbaked stays too soft. Use oven thermometer for accuracy.
Cooling and Storage
Cool briefly on sheet then move to rack. Airtight containers keep them fresh longer. Important for maintaining quality over time.
Decorating Your Cookies
Add sprinkles, nuts or chocolate drizzle for extra appeal. Try different decorations to make them uniquely yours. Personal touches make them special.