Simple Seafood Recipes: Easy & Delicious
Jul 06, 2025 / btwgardenmachine/
Simple Grilled Salmon with Lemon-Herb Butter
Preparing the Salmon
To start, pat the salmon fillets dry with paper towels. This crucial step helps the skin crisp up beautifully during grilling and prevents the fish from steaming instead of searing. Make sure the fillets are completely free of excess moisture. Season generously with salt and freshly ground black pepper, ensuring the seasoning is evenly distributed across the surface of the fish. This preliminary step enhances the flavor of the salmon and complements the upcoming lemon-herb butter.
A light brushing of olive oil on both sides of the salmon fillets is recommended. This thin layer of oil provides a subtle flavor and helps prevent sticking to the grill grates. This simple preparation step adds a touch of elegance to the grilling process, ensuring a smooth and even cooking experience.
Creating the Lemon-Herb Butter
In a small bowl, combine softened butter with finely chopped fresh herbs like dill, parsley, and chives. A generous amount of fresh herbs adds a vibrant flavor profile that complements the delicate salmon. Squeeze the juice of half a lemon into the butter mixture, ensuring a nice citrusy tang. This step is crucial for achieving the perfect balance of flavors in the dish.
The addition of lemon zest adds a beautiful depth of flavor to the butter, elevating the overall taste experience. Mix everything well until the butter is evenly coated with herbs and lemon zest. This ensures an even distribution of flavor throughout the dish.
Grilling the Salmon
Preheat your grill to medium-high heat. Proper preheating allows for even cooking and prevents the salmon from steaming rather than searing. This is an important step to ensure the salmon cooks to perfection. Place the seasoned salmon fillets on the preheated grill grates, skin-side down if using skin-on salmon.
Grill for approximately 4-6 minutes per side, or until the salmon is cooked through and flakes easily with a fork. Overcooking can lead to dry and tough fish, so it's important to monitor the cooking time closely. Use a meat thermometer to ensure the internal temperature reaches 145°F (63°C) for safe consumption.
Serving Suggestions
Once the salmon is cooked, remove it from the grill and let it rest for a few minutes before serving. This allows the juices to redistribute throughout the fish, resulting in a more tender and flavorful piece of salmon. Serve immediately with a dollop of the lemon-herb butter melted over the top.
A side of roasted vegetables, such as asparagus or broccoli, would make a delightful addition to this meal. This enhances the overall presentation and provides a balanced meal with various textures and flavors. A simple side salad can also complement the meal, adding a refreshing contrast to the richness of the salmon.
Tips and Variations
For extra flavor, marinate the salmon in a mixture of lemon juice, olive oil, and herbs for 30 minutes before grilling. This step allows the flavors to meld and intensifies the overall experience. Marinating is a great way to add a deeper flavor dimension to the dish.
Feel free to experiment with different herbs and spices to customize the dish to your liking. For example, you could add garlic powder, paprika, or a touch of cayenne pepper to the butter mixture for a spicy kick. This allows for a personalized culinary experience.
Pan-Seared Scallops with Garlic Butter Sauce
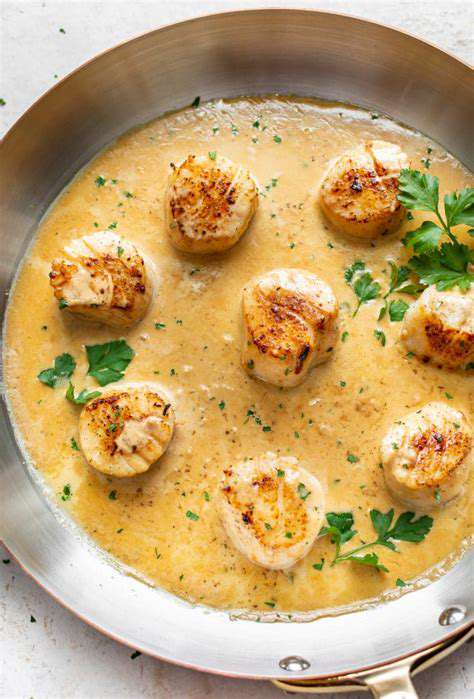
Pan-Searing Perfection
Achieving the perfect pan-seared scallop requires a delicate balance of technique and timing. Overcooking scallops results in a rubbery texture, while undercooking leaves them raw and unappealing. The key is to sear them quickly over high heat, allowing the exterior to develop a beautiful golden-brown crust while the interior remains tender and juicy.
Using high-quality scallops is crucial. Look for fresh, plump scallops with a firm texture. Patting them dry before searing ensures a good sear and prevents steaming, leading to a more flavorful and satisfying result.
Garlic Infusion
Infusing the dish with the savory essence of garlic elevates the flavor profile significantly. A generous amount of minced garlic, sautéed until fragrant, adds a depth and complexity that complements the delicate sweetness of the scallops.
Garlic, when properly incorporated, adds a vibrant flavor that isn't overpowering but rather enhances the overall taste of the dish. The aroma alone is often enough to make your mouth water.
Preparation Techniques
Proper preparation is essential for achieving a successful pan-seared scallop dish. This includes ensuring the scallops are completely dry, which prevents steaming and promotes a nice sear. Using the correct pan and temperature is also critical. A heavy-bottomed pan distributes heat evenly, ensuring consistent cooking.
Sauce Considerations
The sauce complements the scallops, enhancing the overall flavor profile. A light lemon butter sauce, or a white wine sauce, adds a touch of acidity and richness, perfectly balancing the savory garlic and scallops.
Experimenting with different sauces can significantly change the experience. Consider a light herb sauce or a rich cream sauce to suit your taste preference.
Serving Suggestions
Pan-seared scallops pair beautifully with a variety of accompaniments. A simple side of roasted vegetables, such as asparagus or broccoli, offers a refreshing contrast to the richness of the scallops. A bed of rice or pasta provides a satisfying base for the dish, absorbing the flavorful juices.
For a more sophisticated presentation, consider serving the scallops over a bed of saffron risotto or polenta. This elevates the dish to a more upscale dining experience.
Nutritional Value
Scallops are a good source of protein, offering essential nutrients and minerals for a healthy diet. They are low in fat and calories, making them a suitable choice for those watching their health.
Scallops are a nutritious and delicious seafood choice, adding a touch of indulgence to any meal while providing essential vitamins and minerals. Incorporating them into your diet can be a smart way to boost your intake of healthy nutrients.
Cooking Time and Temperature
Precise cooking time and temperature are crucial for achieving perfectly seared scallops. Overcooking will result in a tough texture, while undercooking will leave the scallops raw. Using a meat thermometer to monitor the internal temperature is a useful tool to achieve consistent results.
Maintaining a high heat is key to the pan-searing process, ensuring a good sear and a beautiful golden-brown color. The timing will vary depending on the thickness of the scallops and your desired level of doneness.
Baked Cod with Roasted Vegetables
Preparing the Vegetables
To create a vibrant and flavorful vegetable medley, Select a variety of colorful root vegetables, such as carrots, potatoes, and sweet potatoes. These root vegetables will roast beautifully, developing a tender texture and a subtle sweetness that complements the delicate flavor of the cod. Be sure to chop the vegetables into uniform pieces, roughly 1-inch cubes, for even cooking. This ensures that all the vegetables cook through at the same rate, preventing some pieces from becoming overly soft while others remain raw. Prepping the vegetables ahead of time allows you to focus on other aspects of the dish, ensuring that you are fully present in the kitchen and not rushed.
For added depth of flavor, consider adding a pinch of herbs, such as rosemary or thyme, to the vegetables while roasting. These aromatic additions will infuse the vegetables with a delightful herbal aroma and enhance their natural sweetness. You can also add a drizzle of olive oil to the vegetables before roasting. This helps to create a crispy exterior and a tender interior, further enhancing the overall texture and flavor profile of the dish. Keep a close eye on the vegetables while they roast to avoid burning them, and adjust the cooking time as needed.
Seasoning and Baking the Cod
Once the vegetables are prepped, it's time to prepare the cod fillets. Pat the fillets dry with paper towels to ensure even cooking and prevent steaming. Season the fillets generously with salt, pepper, and a touch of lemon zest for a burst of freshness. Place the seasoned cod fillets on a separate baking sheet lined with parchment paper. This will prevent the fish from sticking and make cleanup a breeze. Arrange the vegetables around the cod fillets, ensuring they are evenly distributed on the baking sheet.
For an extra layer of flavor, you can create a simple marinade for the cod. A mixture of olive oil, lemon juice, garlic powder, and herbs, such as dill or parsley, can be used to marinate the fish for at least 15 minutes before baking. This marinating step allows the flavors to meld together, resulting in a more complex and flavorful cod dish. The marinade will also add moisture to the fish, preventing it from becoming dry during the baking process.
Roasting and Serving
Preheat your oven to 400°F (200°C). Place the baking sheet with the cod and vegetables in the preheated oven and roast for 15-20 minutes, or until the cod is cooked through and flakes easily with a fork. The vegetables should be tender and slightly caramelized. The internal temperature of the cod should reach 145°F (63°C). Always ensure that the fish is cooked to a safe internal temperature to avoid foodborne illness.
Once the cod and vegetables are cooked, remove the baking sheet from the oven and let the dish rest for a few minutes before serving. Garnish with fresh herbs, such as parsley or chives, for an added touch of freshness and visual appeal. Serve the baked cod with roasted vegetables immediately for a truly delicious and satisfying meal. Enjoy the combination of flaky, tender cod and perfectly roasted vegetables, a testament to the simplicity and elegance of this recipe.
A side of fluffy rice or quinoa would make a fantastic accompaniment to this dish, adding a satisfying touch of starch to the meal. The combination of the savory flavors and the tender textures of the cod and vegetables will delight your taste buds and leave you feeling satisfied and energized. This recipe is perfect for a weeknight dinner or a special occasion, offering a delicious and healthy option for your mealtime.
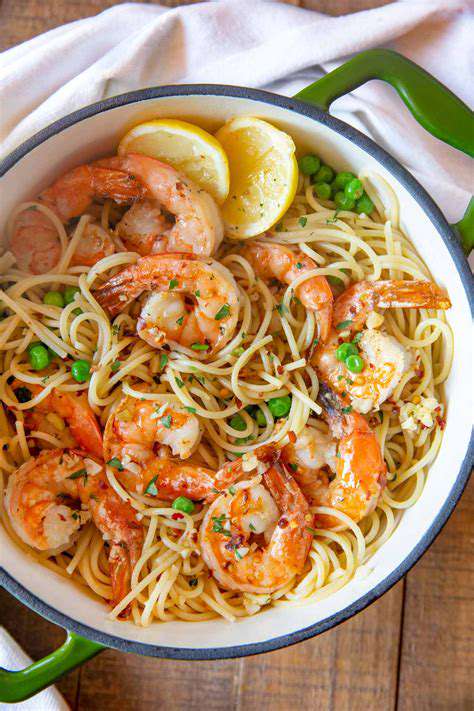
Shrimp Scampi with Linguine
Ingredients and Prep
This classic dish starts with fresh, high-quality shrimp. To ensure the best flavor, select shrimp that are firm and have a bright, translucent appearance. You'll also need linguine pasta, a key component for capturing the delicious sauce. Don't forget the garlic, a crucial ingredient that adds depth and aroma to the dish. Fresh garlic cloves, minced finely, are essential for a flavorful scampi.
Prepare the shrimp by peeling and deveining them. This step is crucial for a clean and flavorful final product. Proper preparation ensures the shrimp cooks evenly and releases their natural juices. In addition, you'll need olive oil for sautéing, butter for richness, and lemon juice for a bright, zesty touch.
The Sautéing Process
Heat a large skillet over medium-high heat. Add a generous drizzle of olive oil and allow it to warm thoroughly. Once hot, add the shrimp and cook until they turn pink and opaque, ensuring they are cooked through. Be careful not to overcrowd the pan, as this can lower the temperature and result in undercooked shrimp.
Add the minced garlic to the skillet and sauté for approximately 30 seconds, or until fragrant. This step brings out the garlic's flavor and adds complexity to the dish. Stirring frequently is important to prevent the garlic from burning.
Sauce Creation and Pasta Cooking
Add butter to the skillet and stir continuously until melted. This step adds richness and a smooth texture to the sauce. Add the lemon juice and cook for another minute, allowing the flavors to meld together. Season with salt and pepper to taste, adjusting the seasoning to your preference.
Cook the linguine according to package directions until al dente. This ensures the pasta retains its firmness and texture, ideal for absorbing the delicious sauce.
Serving and Enjoyment
Drain the cooked linguine and add it to the skillet with the shrimp and sauce. Toss everything together until the pasta is evenly coated. This step ensures every strand of pasta is coated in the flavorful sauce, resulting in a truly satisfying dish.
Serve immediately and garnish with fresh parsley for an extra touch of visual appeal and a fresh herbaceous aroma. Enjoy your delicious Shrimp Scampi with Linguine!
Tuna Salad Lettuce Wraps
A Fresh and Flavorful Take on Tuna Salad
Tuna salad, a classic comfort food, often gets relegated to boring sandwiches. But with a little creativity, it can be transformed into a light and refreshing dish. These lettuce wraps elevate the experience by offering a crunchy, healthy base for the tuna mixture. The fresh flavors of the salad, combined with the vibrant crunch of the lettuce, create a symphony of tastes that are both satisfying and healthy. This recipe is perfect for a light lunch, a quick dinner, or a healthy appetizer.
The key to a delicious tuna salad lies in the quality of the ingredients. Use high-quality tuna, preferably canned in water, to avoid excess sodium. Freshly chopped vegetables, such as celery, onion, and bell pepper, add depth and texture to the salad. A touch of lemon juice brightens the flavor, while a little mayonnaise adds richness and creaminess. Experiment with different herbs and spices to personalize the recipe and tailor it to your taste preferences.
Simple Preparation and Assembly
Preparing these tuna salad lettuce wraps is incredibly straightforward. First, rinse and dry your chosen lettuce leaves. Then, combine the canned tuna with the finely chopped vegetables, lemon juice, mayonnaise, and seasonings in a bowl. Mix gently to ensure the ingredients are evenly distributed. Once the tuna salad is prepared, simply fill each lettuce leaf with the mixture and enjoy. The simple preparation process makes it ideal for busy weeknights, allowing you to enjoy a healthy and satisfying meal without spending hours in the kitchen.
The beauty of this recipe lies in its adaptability. Feel free to adjust the ingredients to suit your taste preferences. For a spicier kick, add a dash of sriracha or a pinch of red pepper flakes. If you're looking for a healthier option, opt for Greek yogurt instead of mayonnaise. These modifications allow you to personalize the dish and make it your own, creating a unique and flavorful experience every time.
Healthy and Delicious Alternatives
This recipe is a fantastic way to incorporate healthy fats and proteins into your diet. Tuna is a great source of protein, and the fresh vegetables provide essential vitamins and minerals. The light and refreshing nature of the dish makes it ideal for those looking for a healthy and satisfying meal option. These lettuce wraps are also a great way to reduce your intake of processed foods and unhealthy ingredients, promoting a healthier lifestyle.
Aside from tuna, you can explore other seafood options for this recipe. Salmon, crab, or shrimp would make equally delicious additions. Consider incorporating other vegetables like carrots, cucumbers, or avocado to add a variety of textures and flavors to the dish. These modifications make the recipe adaptable for various dietary needs and preferences, allowing you to enjoy a diverse range of flavors and textures.